Make Coloring Art With Pixels: A Beginner's Tutorial For Enjoying My Free Coloring Pages In The Procreate App
I can't believe I'm about to say this here on my blog devoted to all things coloring and creativity but...I love creating art digitally with Procreate!
For years I pushed back at anyone suggesting that I should think about investing in an iPad for my creative business so that I could begin using Procreate. "You'll love it" they said, "It's a truly unique program!" they exclaimed, but all I could see was that I wasn't holding a real pen or pencil and drawing on actual paper (tools that I absolutely ADORE) and that my lines would no longer have that special "Michelle" touch to them being created in a way that worshipped perfection and ease over process and practice (my previous perception of digital art, NOT the reality of it at all).
Fast forward to summer 2021 and it is my son, Samuel, that is pestering me to get an iPad ("I'll even help you learn the interface, mom!"). When my son gets excited about something I can't help but pay attention, so in July of that year I plunked the money down for an iPad pro (whoa, are these things expensive) and immediately purchased the Procreate app (a $9.99 one time fee, completely reasonable, imo). Soon there after I realized just how wrong my perception of digital art was (there is SO much practice and process involved in creating digitally, and the personality of the artist absolutely comes through in how they use pixels because there isn't just one way to do it), and I became just as hooked on creating with pixels as I was with pigment. And that is why I've decided to start releasing my Free Coloring Pages as both irl and Procreate-friendly downloads.
But, I will be the first to admit that there is quite a learning curve to Procreate (the app is incredibly dense and powerful), so to help folks jump right into coloring my free illustrations digitally I decided to create a step-by-step and frustration-free art tutorial to guide them through the process. If you learn best through reading and examining still photos, this blog post is for you. For all of you who learn best through watching and listening, I've also created a YouTube version of this tutorial (I'm talking in it and everything, folks), so scroll to the bottom of this post if you prefer picking up new skills with videos!
How to color HCWT Free Coloring Pages in Procreate:
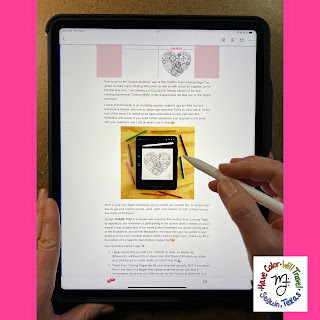
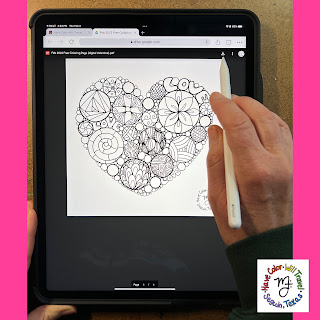
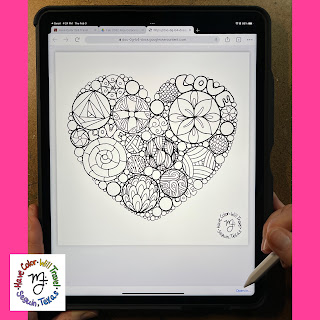
Step 1: Open your email from Michelle at Have Color Will Travel (that's me!) on your iPad device. Select the your Free Coloring Page digital download (I usually make them both a text link and a photo link so they are easy to find) with your Apple Pencil.Step 2: Once your digital download opens up on the web (it's a Google Drive file), select to download it (the arrow pointing down in your top right hand corner of your screen) with your Apple Pencil.
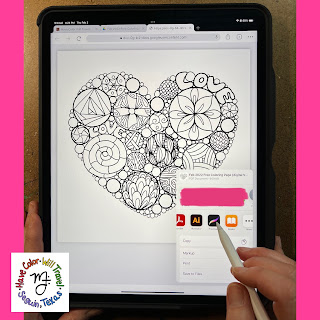
Step three: Once your download file opens up, tap on the phrase "Open in..." at the lower right hand of your screen. Doing this will present a menu of options to you.
Step four: From the menu that opens, select the Procreate app button.
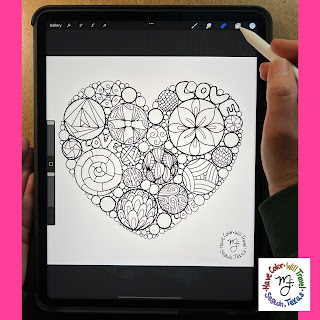
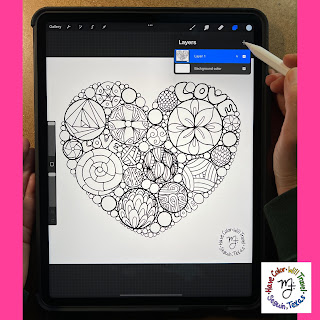
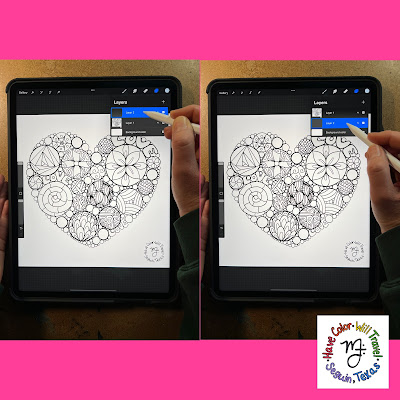
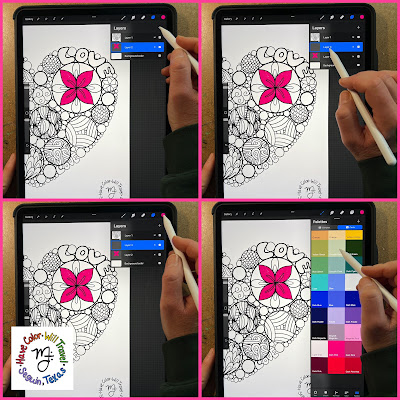
Step five: After tapping on the Procreate app button, your HCWT Free Coloring Page will magically opened in Procreate, but don't start coloring just yet! First tap on your Layers menu in the top right hand corner of your screen (looks like two squares resting on top of each other).
Step six: Once your Layers menu is open, tap the + button to create a new layer.
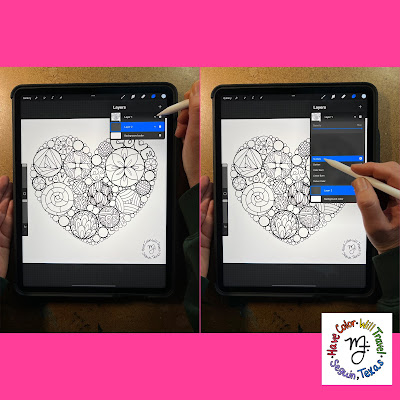
Step seven: After creating a new layer, touch and hold your Apple Pencil to this new layer to drag it BELOW your coloring page layer.
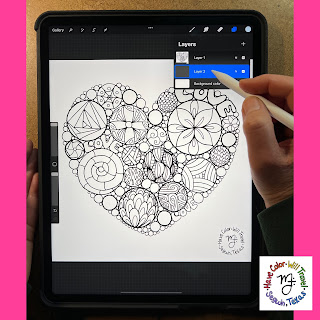
Step eight: Return to your coloring page layer, and tap your Apple Pencil on the N to open the Blend Mode menu. From this menu select the Multiply option for your coloring page layer. I am still learning what all of the blend modes actually do (and feel free to experiment--it's the best way to learn new apps, in my opinion), but for whatever reason selecting Multiply for your coloring page layer locks the illustration in place allowing you to color on it in the same fashion as you would an actual paper coloring page.
Step nine: Return to the new layer you created in Step six by selecting it with your Apple Pencil.
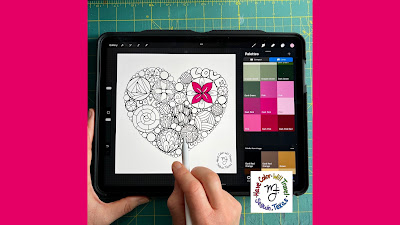
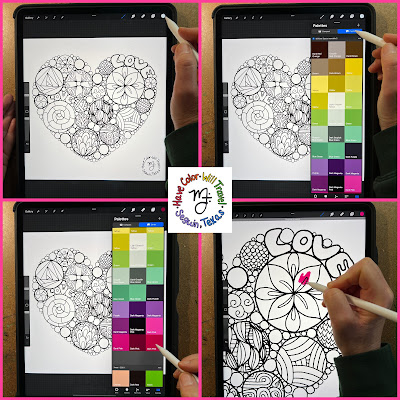
Step ten: With your new layer selected, head up to the Color Palette icon (the circle in the top right hand corner of your screen) and tap it with your Apple Pencil. This is where the fun begins, folks--there are SO many color options in Procreate! For the purposes of this tutorial I had my color palette set to show Cards so that the color tiles would be larger. I could honestly create a whole tutorial all about using the Color Palette section of Procreate, but the best way to figure out this treasure trove of color options is to play around with the system a bit yourself! Explore all the the many ways to create colors (using photos you've taken, screen shots of websites, taking photos with your iPad) and the many ways to adjust colors (through the Disc, Classic, Harmony, and Values menus).
Pro tip: brew yourself a nice cup of coffee or tea, turn on some gentle music and just play with creating color palettes in Procreate that make you smile; it's a relaxing way to spend 15 or 20 minutes and super easy to do in the middle of a hectic day that also includes your iPad.
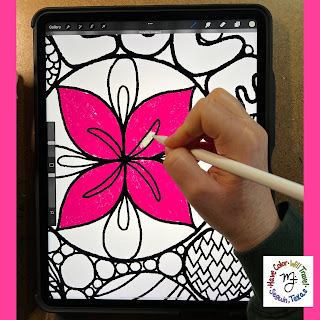
Once you've selected a color, visit the Brush menu (the paint brush icon at the top right of your screen), and select one to color with. I'm using the 6B Pencil brush (all art tools in Procreate are called "brushes," even if they clearly are not a paint brush) which is found in the Sketching collection. I chose this brush because I wanted to give my first coloring experience of one of my illustrations in Procreate a real colored pencil look (I have been using Procreate to create original digital art for the last 6 months or so, but this tutorial is my first time coloring with the app). I encourage you to choose a brush that makes you happy to color this LOVEly illustration in Procreate!
Step eleven: Once you've finished coloring a section of this illustration or finished using a particular color and are ready to move on to a new one, head back to the Layers menu to create a new layer BEFORE continuing to add your creativity to mine. Adding new layers with each color and/or section of the coloring page as you go along will allow you more flexibility to make changes to your coloring art as you progress through the illustration.
For example, in this flower below, I decided to add a mossy green to the veins within the petals. Before I did this I created a new layer and made sure to have it selected BEFORE beginning to add the moss green color.
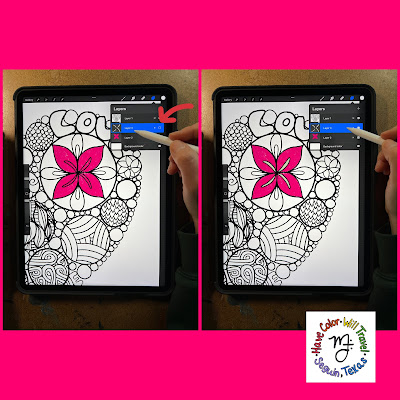
However, after I'd made all the veins in the flower moss green, I wasn't entirely sure I liked what I had done. To see it without the green, rather than erasing all my effort, I went up to my Layers menu and in the right corner of the moss-green-veins layer I deselected the layer. Doing this completely erased my coloring in that section (left tile of the image below). Seeing the area blank again, though, I decided that I actually DID like the moss green in the veins, so rather than coloring it in all over again, I simply turned the layer back on by reselecting it (right tile of the image below).
And there you have it--you're coloring in Procreate!
I thought I'd share my first (ever) colored-in-Procreate coloring page with y'all as a sort of testimonial to how you can teach old-ish cats like myself (I will be turning 49 soon) new tricks:
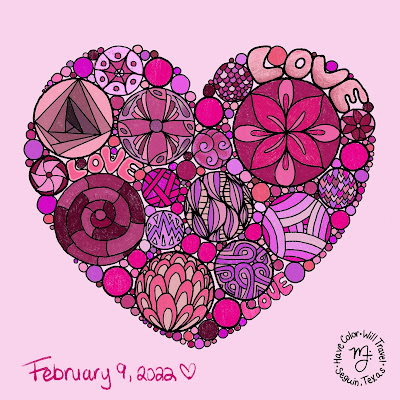 |
| One of the cool things about Procreate is that it keeps track of your creative process. To find these stats of your coloring experience tap the wrench icon in the top left of your screen, select Canvas, scroll to the Canvas Information tab, and then select Statistics. My February Free Coloring Page took me 3 hours and 17 min to complete, and I used 2,413 strokes to color it. This is a random collection of facts, to be sure, but to this coloring nerd these are SUPER COOL random facts! |
This is more pink then I have ever colored with in my entire life (on social media a few weeks ago I asked folks for their color palette suggestions, and a pink monochrome was one of them), but I absolutely love how it turned out in Procreate; I will definitely be exploring the 6B pencil brush more on future digital coloring projects!
If you decide to give coloring this February's Free Coloring Page a try with Procreate OR physical art supplies, I would LOVE (pun intended) to see how you add your creativity to mine! Send me a photo via email using my contact button here (tapping the photo of me in the side bar menu will take you to my website's email portal) or tag me in your #wip and completed coloring page posts on social media (@havecolor_willtravel on Instagram and Have Color Will Travel on Facebook). Getting to see folks color palette and art tool choices for my illustrations is my favorite part of creating coloring experiences for the universe to enjoy!
I hope y'all have enjoyed this technical-yet-creative art tutorial! I've tried my best to demystify the digital coloring process in Procreate with this post, but if after this tutorial you are still feeling lost or have further questions that I didn't think to answer here or the YouTube tutorial below, PLEASE share those with me in the comments on this post; I would love to help you find the answers!


Comments
Post a Comment